Helm 简介
Helm 有两个重要的概念:chart 和 release。
chart 是创建一个应用的信息集合,包括各种 Kubernetes 对象的配置模板、参数定义、依赖关系、文档说明等。chart 是应用部署的自包含逻辑单元。可以将 chart 想象成 apt、yum 中的软件安装包。
release 是 chart 的运行实例,代表了一个正在运行的应用。当 chart 被安装到 Kubernetes 集群,就生成一个 release。chart 能够多次安装到同一个集群,每次安装都是一个 release。
Kubernetes Helm 是一个管理预先配置 Kubernetes 资源包的工具,这里的资源在 Helm 中也被称作 Kubernetes charts。使用 Helm可以:
- 查找并使用已经打包为 Kubernetes charts 的流行软件
- 分享您自己的应用作为 Kubernetes charts
- 为 Kubernetes 应用创建可重复执行的构建
- 为您的 Kubernetes 清单文件提供更智能化的管理
- 管理 Helm 软件包的发布
Helm 包含两个组件:Helm 客户端和 Tiller 服务器,如下图所示。
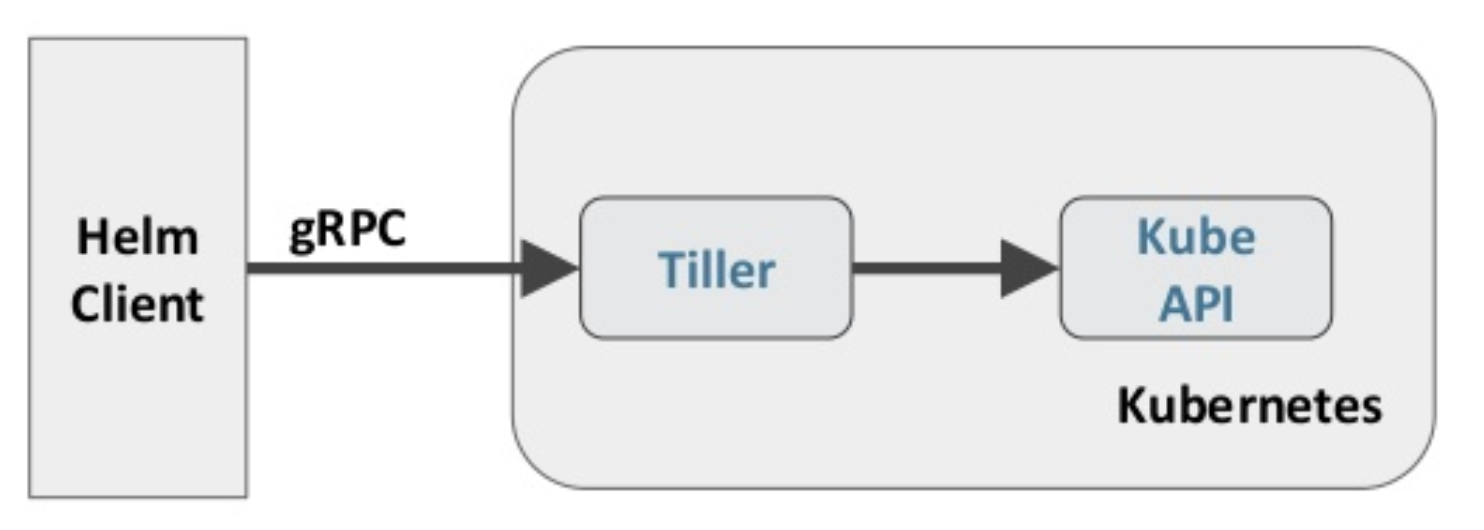
Helm 客户端负责 chart 和 release 的创建和管理以及和 Tiller 的交互。Tiller 服务器运行在 Kubernetes 集群中,它会处理 Helm 客户端的请求,与 Kubernetes API Server 交互。
安装和部署 Helm
安装 Helm 客户端
所有运行 kubectl 的节点均需要安装
1. 下载安装
1
2
3
4
5
6
7
|
# curl https://raw.githubusercontent.com/helm/helm/master/scripts/get | bash

Downloading https://slug:-helm.storage.googleapis.com/helm-v2.12.1-linux-amd64.tar.gz
Preparing to install helm and tiller into /usr/local/bin
helm installed into /usr/local/bin/helm
tiller installed into /usr/local/bin/tiller
Run 'helm init' to configure helm.
|
2. 验证安装
1
2
3
4
|
# helm version

Client: &version.Version{SemVer:"v2.12.1", GitCommit:"02a47c7249b1fc6d8fd3b94e6b4babf9d818144e", GitTreeState:"clean"}
Error: could not find tiller
|
安装安装的版本为 2.12.1,tiller 服务器还没有安装所以有一个报错
3. 安装 helm 的 bash 命令补全脚本
helm 有很多子命令和参数,为了提高使用命令行的效率,通常建议安装 helm 的 bash 命令补全脚本。
1
|
# helm completion bash > .helmrc && echo "source .helmrc" >> .bashrc
|
重新登陆后,就能通过 TAB 自动补全 helm 命令的子命令和参数了。

安装 Tiller 服务器
1. 导入 tiller 镜像
所有节点上面导入 tiller.tar,下载地址:tiller.tar
1
|
# docker load -i tiller.tar
|
2. 创建 helm 服务账号
创建 tiller-rbac-config.yaml 文件,加入以下内容
 1
 2
 3
 4
 5
 6
 7
 8
 9
10
11
12
13
14
15
16
17
18
19
20
|
# vim tiller-rbac-config.yaml

apiVersion: v1
kind: ServiceAccount
metadata:
  name: tiller
  namespace: kube-system
---
apiVersion: rbac.authorization.k8s.io/v1
kind: ClusterRoleBinding
metadata:
  name: tiller
roleRef:
  apiGroup: rbac.authorization.k8s.io
  kind: ClusterRole
  name: cluster-admin
subjects:
  - kind: ServiceAccount
    name: tiller
    namespace: kube-system
|
运行以下命令创建 tiller 服务账号
1
|
# kubectl apply -f tiller-rbac-config.yaml
|
3. 部署 tiller
Tiller 服务器安装非常简单,只需要执行 helm init,这里我们指定使用上一步创建的服务账号。
 1
 2
 3
 4
 5
 6
 7
 8
 9
10
11
12
13
14
15
16
17
18
19
20
|
# helm init --service-account tiller

Creating /root/.helm
Creating /root/.helm/repository
Creating /root/.helm/repository/cache
Creating /root/.helm/repository/local
Creating /root/.helm/plugins
Creating /root/.helm/starters
Creating /root/.helm/cache/archive
Creating /root/.helm/repository/repositories.yaml
Adding stable repo with URL: https://slug:-charts.storage.googleapis.com
Adding local repo with URL: http://127.0.0.1:8879/charts
$HELM_HOME has been configured at /root/.helm.

Tiller (the Helm server-side component) has been installed into your Kubernetes Cluster.

Please note: by default, Tiller is deployed with an insecure 'allow unauthenticated users' policy.
To prevent this, run `helm init` with the --tiller-tls-verify flag.
For more information on securing your installation see: https://docs.helm.sh/using_helm/#securing-your-helm-installation
Happy Helming!
|
验证操作
1. 查看 tiller 状态
 1
 2
 3
 4
 5
 6
 7
 8
 9
10
11
12
13
14
15
16
17
18
|
# kubectl get pods --namespace kube-system

NAME                                   READY   STATUS    RESTARTS   AGE
coredns-86c58d9df4-8zhr5               1/1     Running   1          5d16h
coredns-86c58d9df4-jqn7r               1/1     Running   1          5d16h
etcd-k8s-master                        1/1     Running   1          5d16h
kube-apiserver-k8s-master              1/1     Running   1          5d16h
kube-controller-manager-k8s-master     1/1     Running   1          5d16h
kube-flannel-ds-amd64-krf6t            1/1     Running   1          5d16h
kube-flannel-ds-amd64-tkftg            1/1     Running   1          5d16h
kube-flannel-ds-amd64-zxzld            1/1     Running   1          5d16h
kube-proxy-5znt7                       1/1     Running   1          5d16h
kube-proxy-gl9sl                       1/1     Running   1          5d16h
kube-proxy-q7j7m                       1/1     Running   1          5d16h
kube-scheduler-k8s-master              1/1     Running   1          5d16h
slug:-dashboard-57df4db6b-8b2l4   1/1     Running   0          16h
metrics-server-879f5ff6d-tpszf         1/1     Running   0          16h
tiller-deploy-6f8d4f6c9c-4h95z         1/1     Running   0          2m39s
|
可以看到 tiller 已经是运行状态。
2. 查看 helm 信息
1
2
3
4
|
# helm version

Client: &version.Version{SemVer:"v2.12.1", GitCommit:"02a47c7249b1fc6d8fd3b94e6b4babf9d818144e", GitTreeState:"clean"}
Server: &version.Version{SemVer:"v2.12.1", GitCommit:"02a47c7249b1fc6d8fd3b94e6b4babf9d818144e", GitTreeState:"clean"}
|
使用 Helm 安装 wordpress
1. 搜索 chart
搜索 wordpress 的 charts
1
2
3
4
|
# helm search wordpress

NAME            	CHART VERSION	APP VERSION	DESCRIPTION
stable/wordpress	5.0.3        	5.0.2      	Web publishing platform for building blogs and websites.
|
2. 查看 chart 的存储信息
创建 wordpress 的时候需要申请 PersistentVolumeClaim,由于我们的环境不支持动态申请所以需要手动创建
 1
 2
 3
 4
 5
 6
 7
 8
 9
10
11
12
13
14
15
16
17
18
19
20
21
22
23
24
25
26
27
28
29
30
31
32
33
34
35
36
37
38
39
40
41
42
43
44
|
# helm inspect value stable/wordpress

……
  ## MariaDB admin password
  ## ref: https://github.com/bitnami/bitnami-docker-mariadb/blob/master/README.md#setting-the-root-password-on-first-run
  ##
  # rootUser:
  #   password:

  ## Enable persistence using Persistent Volume Claims
  ## ref: http://slug:.io/docs/user-guide/persistent-volumes/
  ##
  master:
    persistence:
      enabled: true
      ## mariadb data Persistent Volume Storage Class
      ## If defined, storageClassName: <storageClass>
      ## If set to "-", storageClassName: "", which disables dynamic provisioning
      ## If undefined (the default) or set to null, no storageClassName spec is
      ##   set, choosing the default provisioner.  (gp2 on AWS, standard on
      ##   GKE, AWS & OpenStack)
      ##
      # storageClass: "-"
      accessMode: ReadWriteOnce
      size: 8Gi

……

persistence:
  enabled: true
  ## wordpress data Persistent Volume Storage Class
  ## If defined, storageClassName: <storageClass>
  ## If set to "-", storageClassName: "", which disables dynamic provisioning
  ## If undefined (the default) or set to null, no storageClassName spec is
  ##   set, choosing the default provisioner.  (gp2 on AWS, standard on
  ##   GKE, AWS & OpenStack)
  ##
  # storageClass: "-"
  ##
  ## If you want to reuse an existing claim, you can pass the name of the PVC using
  ## the existingClaim variable
  # existingClaim: your-claim
  accessMode: ReadWriteOnce
  size: 10Gi
|
可以看到 wordpress 的 chart 需要两个 pv,分别用于 mariadb(8G) 和 wordpress(10G) 的数据存储。
3. 手动创建 chart 所需的 pv
创建 create-pv.yml 文件,输入以下内容
 1
 2
 3
 4
 5
 6
 7
 8
 9
10
11
12
13
14
15
16
17
18
19
20
21
22
23
24
25
26
27
28
29
30
31
|
# vim create-pv.yml

apiVersion: v1
kind: PersistentVolume
metadata:
  name: mariadb-pv
spec:
  capacity:
    storage: 8Gi
  accessModes:
    - ReadWriteOnce
  persistentVolumeReclaimPolicy: Retain
  #storageClassName: nfs
  nfs:
    path: /nfsdata/mariadb-pv
    server: 172.20.6.116
---
apiVersion: v1
kind: PersistentVolume
metadata:
  name: wordpress-pv
spec:
  capacity:
    storage: 10Gi
  accessModes:
    - ReadWriteOnce
  persistentVolumeReclaimPolicy: Retain
  #storageClassName: nfs
  nfs:
    path: /nfsdata/wordpress-pv
    server: 172.20.6.116
|
创建 pv
1
2
3
4
|
# kubectl apply -f create-pv.yml

persistentvolume/mariadb-pv created
persistentvolume/wordpress-pv created
|
4. 安装 chart
 1
 2
 3
 4
 5
 6
 7
 8
 9
10
11
12
13
14
15
16
17
18
19
20
21
22
23
24
25
26
27
28
29
30
31
32
33
34
35
36
37
38
39
40
41
42
43
44
45
46
47
48
49
50
51
52
53
54
55
|
# helm install --name wordpress stable/wordpress

NAME:   wordpress                                  ---------①---------
LAST DEPLOYED: Fri Jan  4 10:32:57 2019
NAMESPACE: default
STATUS: DEPLOYED

RESOURCES:                                         ---------②---------
==> v1beta1/Deployment
NAME                 DESIRED  CURRENT  UP-TO-DATE  AVAILABLE  AGE
wordpress-wordpress  1        1        1           0          0s

==> v1beta1/StatefulSet
NAME               DESIRED  CURRENT  AGE
wordpress-mariadb  1        1        0s

==> v1/Pod(related)
NAME                                  READY  STATUS   RESTARTS  AGE
wordpress-wordpress-56794ff7b9-rf98x  0/1    Pending  0         0s
wordpress-mariadb-0                   0/1    Pending  0         0s

==> v1/Secret
NAME                 TYPE    DATA  AGE
wordpress-mariadb    Opaque  2     0s
wordpress-wordpress  Opaque  1     0s

==> v1/ConfigMap
NAME                     DATA  AGE
wordpress-mariadb        1     0s
wordpress-mariadb-tests  1     0s

==> v1/PersistentVolumeClaim
NAME                 STATUS   VOLUME  CAPACITY  ACCESS MODES  STORAGECLASS  AGE
wordpress-wordpress  Pending  0s

RESOURCES:
==> v1/Service
NAME                 TYPE          CLUSTER-IP      EXTERNAL-IP  PORT(S)                     AGE
wordpress-mariadb    ClusterIP     10.100.218.132  <none>       3306/TCP                    0s
wordpress-wordpress  LoadBalancer  10.100.36.64    <pending>    80:31051/TCP,443:30169/TCP  0s


NOTES:                                             ---------③---------
1. Get the WordPress URL:

  NOTE: It may take a few minutes for the LoadBalancer IP to be available.
        Watch the status with: 'kubectl get svc --namespace default -w wordpress-wordpress'
  export SERVICE_IP=$(kubectl get svc --namespace default wordpress-wordpress --template "{{ range (index .status.loadBalancer.ingress 0) }}{{.}}{{ end }}")
  echo "WordPress URL: http://$SERVICE_IP/"
  echo "WordPress Admin URL: http://$SERVICE_IP/admin"

2. Login with the following credentials to see your blog

  echo Username: user
  echo Password: $(kubectl get secret --namespace default wordpress-wordpress -o jsonpath="{.data.wordpress-password}" | base64 --decode)
|
输出分为 3 部分(上文输出结果中的①②③):
- ① 本次部署 chart 的描述信息。包括 release 的名字(没有指定,则默认生成)。release 部署的 namespace,默认是 default。release的状态 DEPLOYED 表示已经将 chart 部署到集群。
- ② release 包含的资源: Service、 Deployment、 Secret 等
- ③ release 的使用方法
5. 访问 wordpress
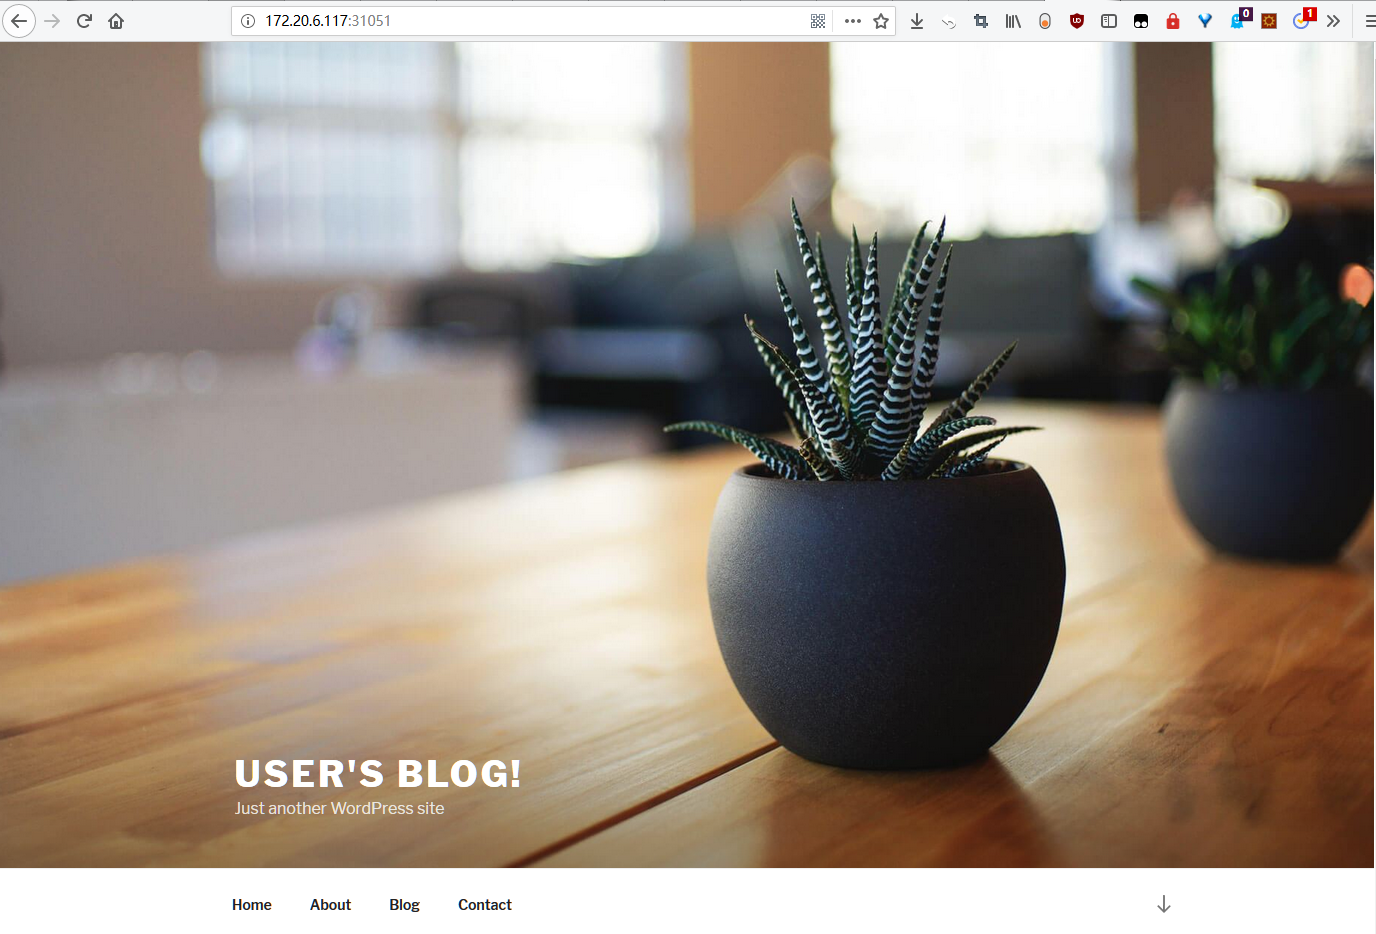
使用 http://nodeip+service_port 访问wordpress,访问地址为:http://172.20.6.116:31051/
 其他信息,包括后台地址,管理员账号等信息可以参考release 的 NOTES 部分。
写在最后
Helm 的使用有点类似 ubuntu 的 apt 或者 RHEL 的 yum,极大的简化了部署一个应用的流程。对于使用者而言,使用 Helm 后不用需要了解 Kubernetes 的 yaml 语法并编写应用部署文件,也无需考虑应用的各种依赖,可以直接通过 Helm 下载并在 kubernetes 上安装需要的应用。
除此以外,Helm 还提供了 kubernetes 上的软件部署,删除,升级,回滚应用的强大功能。
参考文章
Helm 架构 - 每天5分钟玩转 Docker 容器技术(161)
Helm Quickstart