OpenStack SR-IOV研究

关于 SR-IOV 本文就不再介绍了,具体可以查看 Intel® 82599 SR-IOV Driver Companion Guide

一、系统环境

操作系统: RHEL 7.2 OpenStack版本: OpenStack Mitaka Allinone 网卡型号: Intel Corporation 82599ES SR-IVO网卡名: ens1f0, ens1f0

二、服务器配置

在服务器 BIOS 中开启 VT-d 和 SR-IOV

三、操作系统配置

1. 编辑 /etc/default/grub 文件,加入以下内容

 1
 2
 3
 4
 5
 6
 7
 8
 9
10
# vim /etc/default/grub

GRUB_TIMEOUT=5
GRUB_DISTRIBUTOR="$(sed 's, release .*$,,g' /etc/system-release)"
GRUB_DEFAULT=saved
GRUB_DISABLE_SUBMENU=true
GRUB_TERMINAL_OUTPUT="console"
-GRUB_CMDLINE_LINUX="rd.lvm.lv=rhel/root rd.lvm.lv=rhel/swap rhgb quiet"
+GRUB_CMDLINE_LINUX="rd.lvm.lv=rhel/root rd.lvm.lv=rhel/swap rhgb quiet intel_iommu=on"
GRUB_DISABLE_RECOVERY="true"

需要说明的是: ixgbe.max_vfs 参数已经废弃,故没有加入到内核参数中。

2. 重新生成 grub 文件

1
# grub2-mkconfig -o /boot/grub2/grub.cfg

3. 配置 SR-IOV 的网卡开机自启

编辑网卡配置文件,修改以下内容

1
2
BOOTPROTO=none
ONBOOT=yes

4. 设置开机自动创建 VF(计算节点)

1
2
3
4
5
6
7
8
# vim /etc/rc.d/rc.local

echo '0' > /sys/class/net/ens1f0/device/sriov_numvfs
echo '7' > /sys/class/net/ens1f0/device/sriov_numvfs
echo '0' > /sys/class/net/ens1f1/device/sriov_numvfs
echo '7' > /sys/class/net/ens1f1/device/sriov_numvfs

chmod +x /etc/rc.d/rc.local

5. 重启服务器

6. 验证 VF 已经创建,并且是 up 状态

 1
 2
 3
 4
 5
 6
 7
 8
 9
10
11
12
13
14
15
16
17
18
19
20
21
22
23
24
25
26
27
28
29
30
31
32
33
34
35
36
37
38
39
40
41
42
43
44
# lspci | grep Ethernet

05:00.0 Ethernet controller: Intel Corporation 82599ES 10-Gigabit SFI/SFP+ Network Connection (rev 01)
05:00.1 Ethernet controller: Intel Corporation 82599ES 10-Gigabit SFI/SFP+ Network Connection (rev 01)
05:10.0 Ethernet controller: Intel Corporation 82599 Ethernet Controller Virtual Function (rev 01)
05:10.1 Ethernet controller: Intel Corporation 82599 Ethernet Controller Virtual Function (rev 01)
05:10.2 Ethernet controller: Intel Corporation 82599 Ethernet Controller Virtual Function (rev 01)
05:10.3 Ethernet controller: Intel Corporation 82599 Ethernet Controller Virtual Function (rev 01)
05:10.4 Ethernet controller: Intel Corporation 82599 Ethernet Controller Virtual Function (rev 01)
05:10.5 Ethernet controller: Intel Corporation 82599 Ethernet Controller Virtual Function (rev 01)
05:10.6 Ethernet controller: Intel Corporation 82599 Ethernet Controller Virtual Function (rev 01)
05:10.7 Ethernet controller: Intel Corporation 82599 Ethernet Controller Virtual Function (rev 01)
05:11.0 Ethernet controller: Intel Corporation 82599 Ethernet Controller Virtual Function (rev 01)
05:11.1 Ethernet controller: Intel Corporation 82599 Ethernet Controller Virtual Function (rev 01)
05:11.2 Ethernet controller: Intel Corporation 82599 Ethernet Controller Virtual Function (rev 01)
05:11.3 Ethernet controller: Intel Corporation 82599 Ethernet Controller Virtual Function (rev 01)
05:11.4 Ethernet controller: Intel Corporation 82599 Ethernet Controller Virtual Function (rev 01)
05:11.5 Ethernet controller: Intel Corporation 82599 Ethernet Controller Virtual Function (rev 01)
05:11.6 Ethernet controller: Intel Corporation 82599 Ethernet Controller Virtual Function (rev 01)
05:11.7 Ethernet controller: Intel Corporation 82599 Ethernet Controller Virtual Function (rev 01)

# ip link show ens1f0
6: ens1f0: <BROADCAST,MULTICAST,UP,LOWER_UP> mtu 1500 qdisc mq state UP mode DEFAULT qlen 1000
    link/ether 14:02:ec:82:96:c0 brd ff:ff:ff:ff:ff:ff
    vf 0 MAC 00:00:00:00:00:00, spoof checking on, link-state auto
    vf 1 MAC 00:00:00:00:00:00, spoof checking on, link-state auto
    vf 2 MAC 00:00:00:00:00:00, spoof checking on, link-state auto
    vf 3 MAC 00:00:00:00:00:00, spoof checking on, link-state auto
    vf 4 MAC 00:00:00:00:00:00, spoof checking on, link-state auto
    vf 5 MAC 00:00:00:00:00:00, spoof checking on, link-state auto
    vf 6 MAC 00:00:00:00:00:00, spoof checking on, link-state auto
    vf 7 MAC 00:00:00:00:00:00, spoof checking on, link-state auto

# ip link show ens1f1
7: ens1f1: <BROADCAST,MULTICAST,UP,LOWER_UP> mtu 1500 qdisc mq state UP mode DEFAULT qlen 1000
    link/ether 14:02:ec:82:96:c1 brd ff:ff:ff:ff:ff:ff
    vf 0 MAC 00:00:00:00:00:00, spoof checking on, link-state auto
    vf 1 MAC 00:00:00:00:00:00, spoof checking on, link-state auto
    vf 2 MAC 00:00:00:00:00:00, spoof checking on, link-state auto
    vf 3 MAC 00:00:00:00:00:00, spoof checking on, link-state auto
    vf 4 MAC 00:00:00:00:00:00, spoof checking on, link-state auto
    vf 5 MAC 00:00:00:00:00:00, spoof checking on, link-state auto
    vf 6 MAC 00:00:00:00:00:00, spoof checking on, link-state auto
    vf 7 MAC 00:00:00:00:00:00, spoof checking on, link-state auto

四、OpenStack 配置

安装 sr-iov agent(计算节点)

1
# yum -y install openstack-neutron-sriov-nic-agent.noarch

控制节点配置

1. 修改 nova 调度,启用 PciPassthrough Filter

1
2
3
4
5
# vim /etc/nova/nova.conf

[DEFAULT]
scheduler_available_filters=nova.scheduler.filters.all_filters
scheduler_default_filters=RetryFilter,AvailabilityZoneFilter,RamFilter,DiskFilter,ComputeFilter,ComputeCapabilitiesFilter,ImagePropertiesFilter,ServerGroupAntiAffinityFilter,ServerGroupAffinityFilter,PciPassthroughFilter

2. 在 ML2 中加载 sriovnicswitch mechanism driver,并设置网络绑定

 1
 2
 3
 4
 5
 6
 7
 8
 9
10
11
12
13
# vim /etc/neutron/plugins/ml2/ml2_conf.ini

[ml2]
type_drivers = flat,vlan
tenant_network_types =
mechanism_drivers = openvswitch,sriovnicswitch
extension_drivers = port_security

[ml2_type_vlan]
network_vlan_ranges = provider,sriov1,sriov2

[securitygroup]
firewall_driver = neutron.agent.firewall.NoopFirewallDriver

3. 增加支持的 PCI 厂家的 VF 设备

  • 查看id
 1
 2
 3
 4
 5
 6
 7
 8
 9
10
11
12
13
14
15
16
17
18
19
20
21
22
23
24
# lspci -nn | grep -i ethernet

02:00.0 Ethernet controller [0200]: Broadcom Corporation NetXtreme BCM5719 Gigabit Ethernet PCIe [14e4:1657] (rev 01)
02:00.1 Ethernet controller [0200]: Broadcom Corporation NetXtreme BCM5719 Gigabit Ethernet PCIe [14e4:1657] (rev 01)
02:00.2 Ethernet controller [0200]: Broadcom Corporation NetXtreme BCM5719 Gigabit Ethernet PCIe [14e4:1657] (rev 01)
02:00.3 Ethernet controller [0200]: Broadcom Corporation NetXtreme BCM5719 Gigabit Ethernet PCIe [14e4:1657] (rev 01)
05:00.0 Ethernet controller [0200]: Intel Corporation 82599ES 10-Gigabit SFI/SFP+ Network Connection [8086:10fb] (rev 01)
05:00.1 Ethernet controller [0200]: Intel Corporation 82599ES 10-Gigabit SFI/SFP+ Network Connection [8086:10fb] (rev 01)
05:10.0 Ethernet controller [0200]: Intel Corporation 82599 Ethernet Controller Virtual Function [8086:10ed] (rev 01)
05:10.1 Ethernet controller [0200]: Intel Corporation 82599 Ethernet Controller Virtual Function [8086:10ed] (rev 01)
05:10.2 Ethernet controller [0200]: Intel Corporation 82599 Ethernet Controller Virtual Function [8086:10ed] (rev 01)
05:10.3 Ethernet controller [0200]: Intel Corporation 82599 Ethernet Controller Virtual Function [8086:10ed] (rev 01)
05:10.4 Ethernet controller [0200]: Intel Corporation 82599 Ethernet Controller Virtual Function [8086:10ed] (rev 01)
05:10.5 Ethernet controller [0200]: Intel Corporation 82599 Ethernet Controller Virtual Function [8086:10ed] (rev 01)
05:10.6 Ethernet controller [0200]: Intel Corporation 82599 Ethernet Controller Virtual Function [8086:10ed] (rev 01)
05:10.7 Ethernet controller [0200]: Intel Corporation 82599 Ethernet Controller Virtual Function [8086:10ed] (rev 01)
05:11.0 Ethernet controller [0200]: Intel Corporation 82599 Ethernet Controller Virtual Function [8086:10ed] (rev 01)
05:11.1 Ethernet controller [0200]: Intel Corporation 82599 Ethernet Controller Virtual Function [8086:10ed] (rev 01)
05:11.2 Ethernet controller [0200]: Intel Corporation 82599 Ethernet Controller Virtual Function [8086:10ed] (rev 01)
05:11.3 Ethernet controller [0200]: Intel Corporation 82599 Ethernet Controller Virtual Function [8086:10ed] (rev 01)
05:11.4 Ethernet controller [0200]: Intel Corporation 82599 Ethernet Controller Virtual Function [8086:10ed] (rev 01)
05:11.5 Ethernet controller [0200]: Intel Corporation 82599 Ethernet Controller Virtual Function [8086:10ed] (rev 01)
05:11.6 Ethernet controller [0200]: Intel Corporation 82599 Ethernet Controller Virtual Function [8086:10ed] (rev 01)
05:11.7 Ethernet controller [0200]: Intel Corporation 82599 Ethernet Controller Virtual Function [8086:10ed] (rev 01)
  • 配置设备ID
1
2
3
4
# vim /etc/neutron/plugins/ml2/ml2_conf_sriov.ini

[ml2_sriov]
supported_pci_vendor_devs = 8086:10ed

4. 修改 neutron-server 启动文件,加载 ml2_conf_sriov.ini 文件

1
2
3
4
5
6
# vim /usr/lib/systemd/system/neutron-server.service

[Service]
Type=notify
User=neutron
ExecStart=/usr/bin/neutron-server --config-file /usr/share/neutron/neutron-dist.conf --config-dir /usr/share/neutron/server --config-file /etc/neutron/neutron.conf --config-file /etc/neutron/plugin.ini --config-file /etc/neutron/plugins/ml2/ml2_conf_sriov.ini --config-dir /etc/neutron/conf.d/common --config-dir /etc/neutron/conf.d/neutron-server --log-file /var/log/neutron/server.log

5. 重启服务

1
2
3
# systemctl daemon-reload
# systemctl restart neutron-server.service
# systemctl restart openstack-nova-scheduler.service

计算节点配置

1. 配置 PCI 设备白名单

1
2
3
4
# vim /etc/nova/nova.conf

[DEFAULT]
pci_passthrough_whitelist = [{"devname":"ens1f0","physical_network":"sriov1"},{"devname":"ens1f1","physical_network":"sriov2"}]

2. 配置 SR-IOV neutron agent

1
2
3
4
5
6
7
8
# vim /etc/neutron/plugins/ml2/sriov_agent.ini

[securitygroup]
firewall_driver = neutron.agent.firewall.NoopFirewallDriver

[sriov_nic]
physical_device_mappings = sriov1:ens1f0,sriov2:ens1f1
exclude_devices =

3. 启动/重启服务

1
2
3
# systemctl enable neutron-sriov-nic-agent.service
# systemctl start neutron-sriov-nic-agent.service
# systemctl restart openstack-nova-compute.service

五、测试

1. 创建网络

1
2
3
4
5
6
7
创建网络
# neutron net-create --provider:network_type vlan --provider:physical_network sriov1 --provider:segmentation_id 10 --router:external net1
# neutron net-create --provider:network_type vlan --provider:physical_network sriov2 --provider:segmentation_id 20 --router:external net2

创建子网(禁用DHCP)
# neutron subnet-create --name sriov1-net --disable-dhcp --ip-version 4 net1 10.0.1.0/24
# neutron subnet-create --name sriov2-net --disable-dhcp --ip-version 4 net2 10.0.2.0/24

2. 创建 port

1
2
# neutron port-create net1 --binding:vnic-type direct
# neutron port-create net2 --binding:vnic-type direct

3. 创建虚拟机

1
2
3
4
5
6
7
8
9
# neutron port-list
+--------------------------------------+------+-------------------+---------------------------------------------------------------------------------+
| id                                   | name | mac_address       | fixed_ips                                                                       |
+--------------------------------------+------+-------------------+---------------------------------------------------------------------------------+
| ba446152-bd45-4a38-9947-1d539e538a68 |      | fa:16:3e:42:6b:fd | {"subnet_id": "04ea17b5-08da-41cc-8114-e0781a1f8041", "ip_address": "10.0.1.3"} |
| bf8a7655-ac16-4dce-bb12-54efd2dd0967 |      | fa:16:3e:77:9f:8a | {"subnet_id": "6612bf80-d682-474f-886e-93029a4a0964", "ip_address": "10.0.2.3"} |
+--------------------------------------+------+-------------------+---------------------------------------------------------------------------------+

# openstack server create --image rhel-server-7.5-x86_64-kvm --flavor 6 --nic port-id=ba446152-bd45-4a38-9947-1d539e538a68 --nic port-id=bf8a7655-ac16-4dce-bb12-54efd2dd0967 --config-drive True test

4. 查看虚拟机网卡

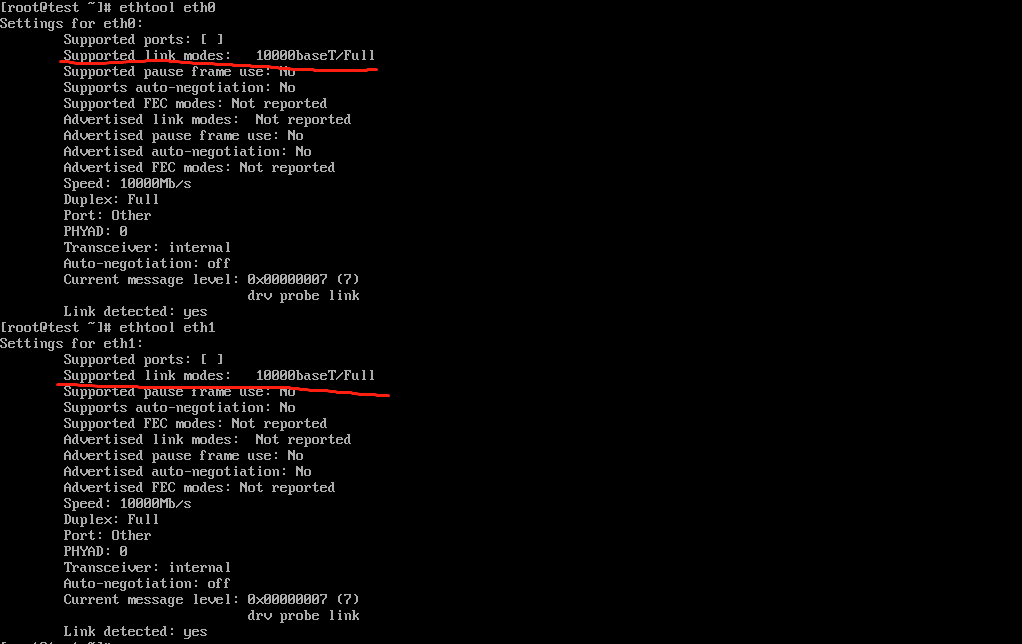
  • 速率
    网络速率
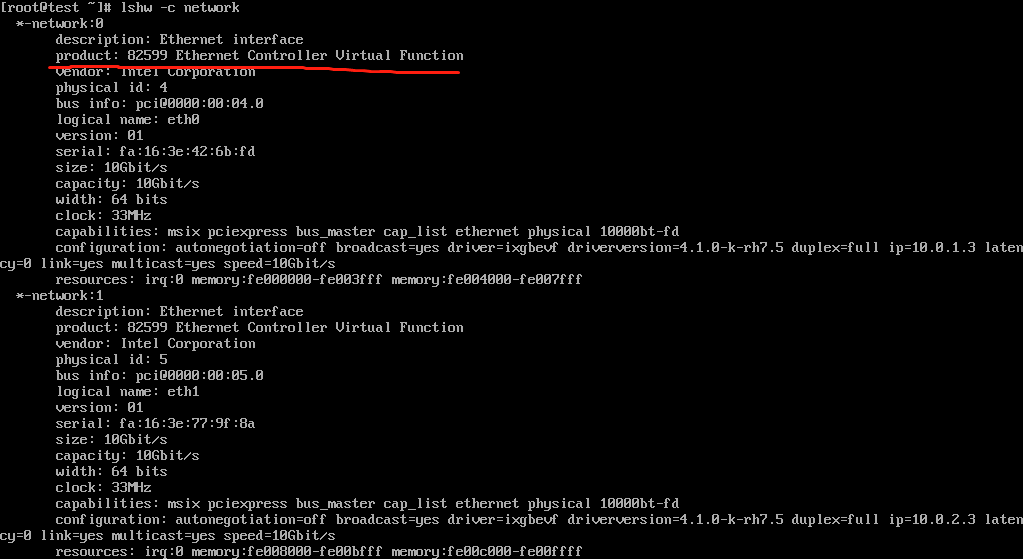
  • 型号
    网卡型号

5. 查看 VF

 1
 2
 3
 4
 5
 6
 7
 8
 9
10
11
12
13
14
15
16
17
18
19
20
21
22
23
# ip link show ens1f0
6: ens1f0: <BROADCAST,MULTICAST,UP,LOWER_UP> mtu 1500 qdisc mq state UP mode DEFAULT qlen 1000
    link/ether 14:02:ec:82:96:c0 brd ff:ff:ff:ff:ff:ff
    vf 0 MAC 00:00:00:00:00:00, spoof checking on, link-state auto
    vf 1 MAC 00:00:00:00:00:00, spoof checking on, link-state auto
    vf 2 MAC 00:00:00:00:00:00, spoof checking on, link-state auto
    vf 3 MAC 00:00:00:00:00:00, spoof checking on, link-state auto
    vf 4 MAC 00:00:00:00:00:00, spoof checking on, link-state auto
    vf 5 MAC 00:00:00:00:00:00, spoof checking on, link-state auto
    vf 6 MAC 00:00:00:00:00:00, spoof checking on, link-state auto
    vf 7 MAC fa:16:3e:42:6b:fd, vlan 10, spoof checking on, link-state auto

# ip link show ens1f1
7: ens1f1: <BROADCAST,MULTICAST,UP,LOWER_UP> mtu 1500 qdisc mq state UP mode DEFAULT qlen 1000
    link/ether 14:02:ec:82:96:c1 brd ff:ff:ff:ff:ff:ff
    vf 0 MAC 00:00:00:00:00:00, spoof checking on, link-state auto
    vf 1 MAC 00:00:00:00:00:00, spoof checking on, link-state auto
    vf 2 MAC 00:00:00:00:00:00, spoof checking on, link-state auto
    vf 3 MAC 00:00:00:00:00:00, spoof checking on, link-state auto
    vf 4 MAC 00:00:00:00:00:00, spoof checking on, link-state auto
    vf 5 MAC 00:00:00:00:00:00, spoof checking on, link-state auto
    vf 6 MAC 00:00:00:00:00:00, spoof checking on, link-state auto
    vf 7 MAC fa:16:3e:77:9f:8a, vlan 20, spoof checking on, link-state auto

参考文章

SR-IOV-Passthrough-For-Networking
OpenStack Networking Guide
OpenStack Mitaka Neutron SR-IOV配置

一个默默无闻的工程师的日常
Built with Hugo
主题 StackJimmy 设计