测试中遇到这样的情况,vmware虚拟机中增加的 sdb ,可用空间快要满了,需要增加空间,方法记录如下
1. 在VMware上扩展磁盘
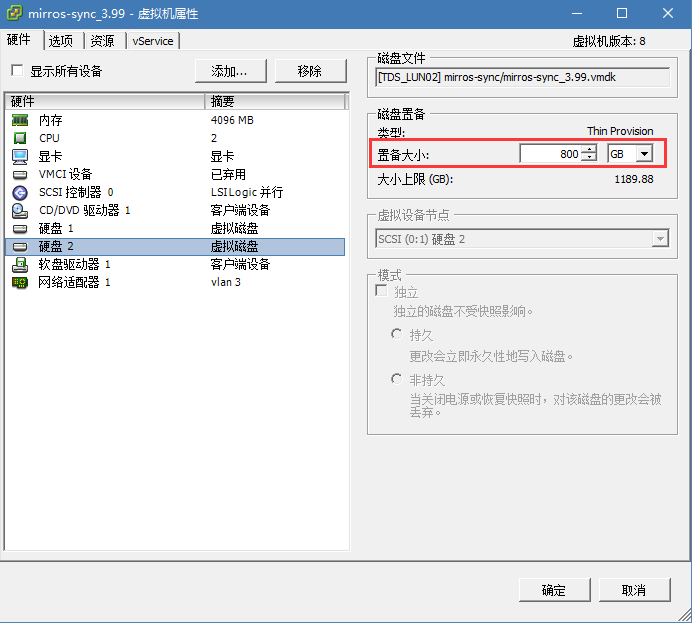
在 vmware 虚拟机编辑页面,扩展磁盘的可用空间 (500GB -> 800GB)
2. 重启虚拟机
重启后查看分区是否正确识别,可以看到已经正确识别新的分区大小
 1
 2
 3
 4
 5
 6
 7
 8
 9
10
11
12
13
14
15
|
# parted /dev/sdb
GNU Parted 3.1
Using /dev/sdb
Welcome to GNU Parted! Type 'help' to view a list of commands.
(parted) p
Model: VMware Virtual disk (scsi)
Disk /dev/sdb: 859GB
Sector size (logical/physical): 512B/512B
Partition Table: msdos
Disk Flags:

Number  Start   End    Size   Type     File system  Flags
 1      1049kB  537GB  537GB  primary  xfs

(parted) quit
|
3. 重新分区
删除原来分区,重新创建新的分区
 1
 2
 3
 4
 5
 6
 7
 8
 9
10
11
12
13
14
15
16
17
18
19
20
21
22
23
24
25
26
27
28
29
30
31
32
33
34
35
36
37
38
39
40
41
42
43
44
|
# fdisk /dev/sdb
Welcome to fdisk (util-linux 2.23.2).

Changes will remain in memory only, until you decide to write them.
Be careful before using the write command.

Command (m for help): p

Disk /dev/sdb: 859.0 GB, 858993459200 bytes, 1677721600 sectors
Units = sectors of 1 * 512 = 512 bytes
Sector size (logical/physical): 512 bytes / 512 bytes
I/O size (minimum/optimal): 512 bytes / 512 bytes
Disk label type: dos
Disk identifier: 0x634e8675

Device Boot      Start         End      Blocks   Id  System
/dev/sdb1            2048  1048575999   524286976   83  Linux

Command (m for help): d                     # 删除分区
Selected partition 1
Partition 1 is deleted

Command (m for help): n                     # 创建新的分区
Partition type:
   p   primary (0 primary, 0 extended, 4 free)
   e   extended
Select (default p):
Using default response p
Partition number (1-4, default 1):
First sector (2048-1677721599, default 2048):
Using default value 2048
Last sector, +sectors or +size{K,M,G} (2048-1677721599, default 1677721599):
Using default value 1677721599
Partition 1 of type Linux and of size 800 GiB is set

Command (m for help): w
The partition table has been altered!

Calling ioctl() to re-read partition table.

WARNING: Re-reading the partition table failed with error 16: Device or resource busy.
The kernel still uses the old table. The new table will be used at
the next reboot or after you run partprobe(8) or kpartx(8)
Syncing disks.
|
4. 重启系统,确保分区表被重新读取
5. 扩展分区
首先 mount 新分区,然后使用 xfs_growfs 命令扩展分区
 1
 2
 3
 4
 5
 6
 7
 8
 9
10
11
12
13
14
|
# mount /dev/sdb1 /opt/yum/sample
# xfs_growfs /dev/sdb1
meta-data=/dev/sdb1              isize=512    agcount=4, agsize=32767936 blks
         =                       sectsz=512   attr=2, projid32bit=1
         =                       crc=1        finobt=0 spinodes=0
data     =                       bsize=4096   blocks=131071744, imaxpct=25
         =                       sunit=0      swidth=0 blks
naming   =version 2              bsize=4096   ascii-ci=0 ftype=1
log      =internal               bsize=4096   blocks=63999, version=2
         =                       sectsz=512   sunit=0 blks, lazy-count=1
realtime =none                   extsz=4096   blocks=0, rtextents=0
data blocks changed from 131071744 to 209714944

#如果分区是 ext4 格式需要使用 resize2fs 命令
|
6. 验证操作
新分区的大小已经变为800G,原来的文件也没有丢失
1
2
3
4
|
# df -h
Filesystem               Size  Used Avail Use% Mounted on
……
/dev/sdb1                800G  433G  368G  55% /opt/yum/sample
|